Skip to content
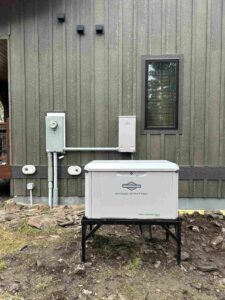
Some mornings on a job, the work starts before a customer’s generator is ever touched. Getting the crew’s own shop generator running can be its own small battle, and that was true on this job before a single tool ever touched the customer’s new unit. Once that part was behind us, the crew got to work completing a full residential generator installation, setting a 26-kilowatt Briggs & Stratton standby generator while filming the entire process. Here is what actually goes into a job like this.
Setting the Pad
Every residential generator installation starts with the pad, and a generator pad sits on gravel, which is never naturally flat. Getting a solid, stable base means smoothing the gravel, setting the pad, checking it with a level, and adjusting high and low spots until the pad reads true. That process took a few passes on this job, easing the pad down into low spots and knocking down high ones until it sat correctly.
On this installation, the crew left a slight grade to encourage water to drain away from the unit instead of collecting around its base.
Trenching and Setting the Transfer Switch
With the generator itself set, the next step in any residential generator installation is getting power and controls routed to the automatic transfer switch, the component that senses an outage and switches the home over to generator power. On this job, that meant digging down to expose existing conduit, setting a post to mount the transfer switch, and running new conduit between the post and the generator.
Joining PVC conduit correctly is its own small craft. Cuts get made cleanly near the bell end of each fitting, and a pull tape gets protected during the cut so it is not damaged before it is ever used to pull wire. When it came to solvent welding the joints, the crew made a point of applying cement generously and completing each joint while it was still fully wet, unlike an older section of pipe on the same property where the cement had clearly started to set before the joint was ever pushed together. A proper joint should show a small bead of cement squeezed out around the fitting once it is assembled. That bead is not a mess to wipe away. It is confirmation that the joint got full coverage and will actually hold.
Pulling Wire and Making Connections
Once the conduit run was in place, the crew sized and cut the correct knockouts on the transfer switch enclosure, including a larger opening for the main conduit and a smaller one for a secondary run, positioning each so it would clear the enclosure’s internal mounting hardware rather than fighting it later. Every conduit connector went in with a locknut on the inside of the enclosure, a small step that keeps fittings from working loose over time.
From there, it was a wire pull of roughly 200 feet from the generator to the transfer switch and panel, enough distance that it becomes a two-person job rather than something one person should muscle through alone. By the time the enclosure was mounted and squared up, the crew guessed it was built to handle wind loads well beyond anything South Dakota typically sees, which says less about local weather and more about not cutting corners on something that is supposed to last for years outside.
None of these steps look dramatic on camera, but skipping any one of them is exactly how a generator installation ends up with a rocking pad, water pooling at the base, or a transfer switch enclosure that lets moisture in around a fitting nobody bothered to tighten.
If you are ready to talk through a residential generator installation for your own home, reach out to our team, and we will walk you through what the process looks like for your property.
We serve homeowners throughout Rapid City, Hot Springs, Piedmont, Hermosa,